docker-mailserver를 통해 Ubuntu 서버에 간단하게 도커로 메일서버를 설치하는 방법을 소개한다.
docker 및 docker-compose는 설치되어 있는 환경이라고 가정한다.
- 메일서버를 설치할 서버가 필요하다. 본인은 oracle cloud 인스턴스를 활용하여 진행할 예정이다.
- 구성환경 : OC A1 인스턴스 (Ubuntu 22.04)
- 도메인 및 DNS에 대한 레코드 수정 권한이 있어야 한다.
- 최소한의 도메인을 설정해야 한다. 예를 들어 test@example.com 형태의 메일주소를 사용하고 싶다면 mail.example.com 과 같이 MX 레코드와 A 레코드 등을 설정해주어야 한다.
- 아래 명령어로 compose.yaml 파일 및 mailserver.env 파일을 받아온다.
DMS_GITHUB_URL="https://raw.githubusercontent.com/docker-mailserver/docker-mailserver/master"
wget "${DMS_GITHUB_URL}/compose.yaml"
wget "${DMS_GITHUB_URL}/mailserver.env"
추가적으로 본인은 docker-compose.yml 같은 파일이름이 편해서 compose.yaml 파일 이름을 바꿔주었다.
- yaml 파일을 열어서 원하는 내용을 수정한다.
[공식사이트] https://docker-mailserver.github.io/docker-mailserver/latest/usage/
services:
  mailserver:
    image: ghcr.io/docker-mailserver/docker-mailserver:latest
    container_name: mailserver
    # Provide the FQDN of your mail server here (Your DNS MX record should point to this value)
    hostname: mail.[doamin.com]
    domainname: [doamin.com]
    env_file: mailserver.env
    # More information about the mail-server ports:
    # https://docker-mailserver.github.io/docker-mailserver/latest/config/security/understanding-the-ports/
    # To avoid conflicts with yaml base-60 float, DO NOT remove the quotation marks.
    ports:
      - "25:25"    # SMTP  (explicit TLS => STARTTLS, Authentication is DISABLED => use port 465/587 instead)
      - "143:143"  # IMAP4 (explicit TLS => STARTTLS)
      - "465:465"  # ESMTP (implicit TLS)
      - "587:587"  # ESMTP (explicit TLS => STARTTLS)
      - "993:993"  # IMAP4 (implicit TLS)
    volumes:
      - [mail_path]/dms/mail-data/:/var/mail/
      - [mail_path]/dms/mail-state/:/var/mail-state/
      - [mail_path]/dms/mail-logs/:/var/log/mail/
      - [mail_path]/dms/config/:/tmp/docker-mailserver/
      - [certbot_path]/conf:/etc/letsencrypt/
      - /etc/localtime:/etc/localtime:ro
    restart: always
    stop_grace_period: 1m
    # Uncomment if using `ENABLE_FAIL2BAN=1`:
    cap_add:
      - NET_ADMIN
    healthcheck:
      test: "ss --listening --tcp | grep -P 'LISTEN.+:smtp' || exit 1"
      timeout: 3s
      retries: 0

----------------------ssl 인증서 발급을 위한 부분---------------------
  nginx:
    image: nginx:latest
    container_name: nginx
    restart: always
    volumes:
      - [nginx_path]/www/mail:/var/www/mail
      - [nginx_path]/conf.d:/etc/nginx/conf.d
      - [certbot_path]/conf:/etc/nginx/ssl
      - [certbot_path]/data:/var/www/certbot
    ports:
      - 80:80
      - 443:443

  certbot:
    image: certbot/certbot:latest
    container_name: certbot
    command: certonly --webroot --webroot-path=/var/www/certbot -d mail.[domain.com]
    volumes:
      - [certbot_path]/conf:/etc/letsencrypt
      - [certbot_path]/logs:/var/log/letsencrypt
      - [certbot_path]/data:/var/www/certbot
- volumes: 부분과 hostname 부분을 수정해준다. volumes 부분은 ssl 인증서 추가를 위해 경로를 맞추어 수정해야 한다.
- mailserver.env 파일을 수정한다. 본인이 수정한 부분은 아래와 같다. 추가적으로 수정할 부분은 변경하면 된다.
SSL_TYPE=letsencrypt
SSL_CERT_PATH=/etc/letsencrypt/[인증서경로]
SSL_KEY_PATH=/etc/letsencrypt/[개인키경로]
ENABLE_FAIL2BAN=1
TZ=Asia/Seoul
- 그리고 certbot 도커를 사용해 webroot 방식으로 ssl 인증서를 발급받기 위해 아래 내용을 nginx/conf.d/[domain].conf 에 추가해준다.
server {
     listen [::]:80;
     listen 80;

     server_name mail.[domain.com];
     server_tokens off;

     location ~ /.well-known/acme-challenge {
         allow all;
         root /var/www/certbot;
     }
}- 설정이 완료되면 docker-compose.yml이 있는 위치에서 docker-compose up -d ; docker-compose logs -f 명령어로 실행 상태 및 로그를 확인한다.
nginx       | [notice] 1#1: start worker process 30
nginx       | [notice] 1#1: start worker process 31
certbot     | Saving debug log to letsencrypt.log
certbot     | Requesting a certificate for mail.domain.com
mailserver  | [   INF   ]  Welcome to docker-mailserver v13.3.1
mailserver  | [   INF   ]  Checking configuration
mailserver  | [   INF   ]  Configuring mail server

nginx       | 23.xxx.xxx.107 - - "GET /.well-known/acme-challenge/abcdefg123456 HTTP/1.1" 200 87 "-" "Mozilla/5.0 (compatible; Let's Encrypt; +https://www.letsencrypt.org)" "-"
nginx       | 34.xxx.xxx.51 - - "GET /.well-known/acme-challenge/abcdefg123456 HTTP/1.1" 200 87 "-" "Mozilla/5.0 (compatible; Let's Encrypt; +https://www.letsencrypt.org)" "-"
nginx       | 18.xxx.xxx.104 - - "GET /.well-known/acme-challenge/abcdefg123456 HTTP/1.1" 200 87 "-" "Mozilla/5.0 (compatible; Let's Encrypt; +https://www.letsencrypt.org)" "-"
certbot     |
certbot     | Successfully received certificate.
- 위와 같이 “Successfully received certificate.” 가 뜨면 위에 설정한 ssl config 디렉터리에 인증서가 생성되어 있을 것이다.
(발급이 정상적으로 안되는 경우 방화벽 설정을 확인해서 nginx로 들어오는 인증 요청이 막히지 않는지 확인해야 한다) - 마지막으로 아래 명령어로 docker-mailserver의 이메일 계정을 생성한다.
docker exec -it <CONTAINER NAME> setup email add user@domain.com- 이후 썬더버드같은 MUA를 설치하고 계정설정을 진행한다.
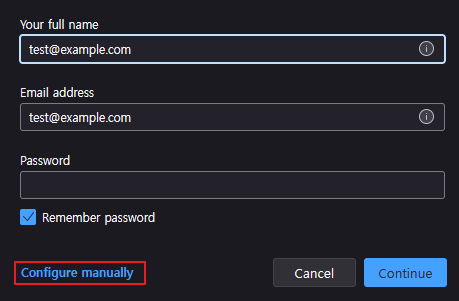
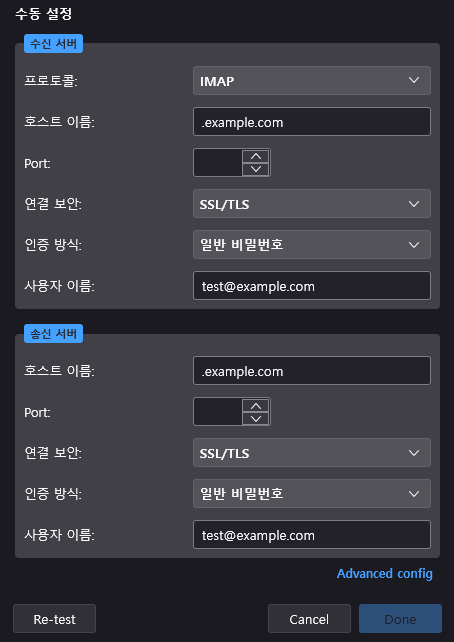
- 수신 서버와 송신 서버 정보를 입력하여 설정한다. 위에서 pop3 또는 imap으로 설정한 내용으로 설정하면된다.