이 글은 Ubuntu Linux를 기준으로 Postfix+Dovecot을 사용하여 메일서버를 만들어 메일을 주고받는 방법에 대한 설명이다.
1. postfix 데몬을 설치한다.
sudo apt-get install postfix2. postfix 기본적인 설정을 해준다.
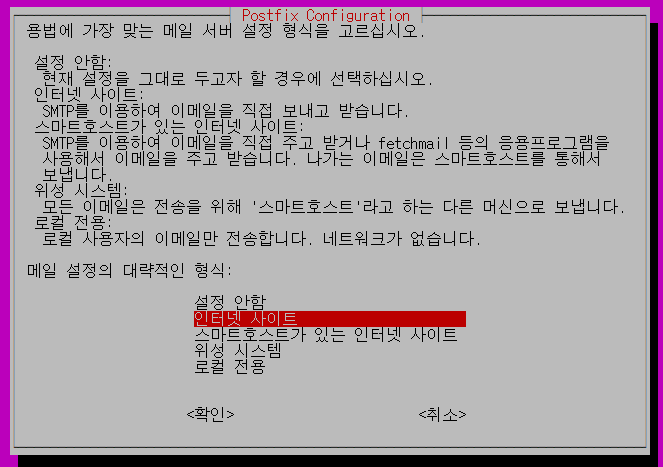
dpkg-reconfigure postfix
1. 인터넷 사이트 (Internet Site)
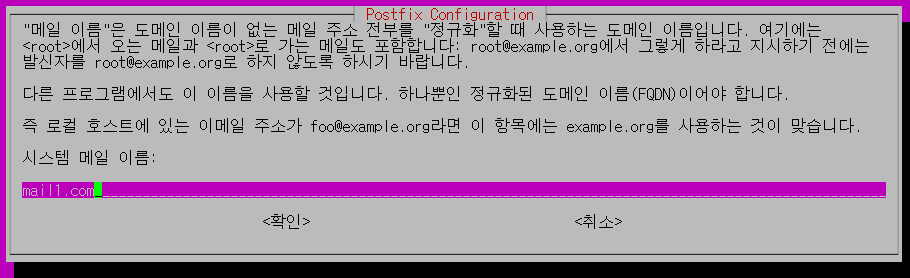
2. mail1.com (메일서버로 사용할 도메인주소)
3. username (메일 관리자계정)
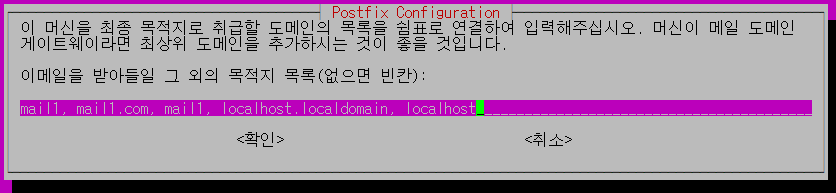
4. mail1, mail1.com, localhost.localdomain, localhost (default)
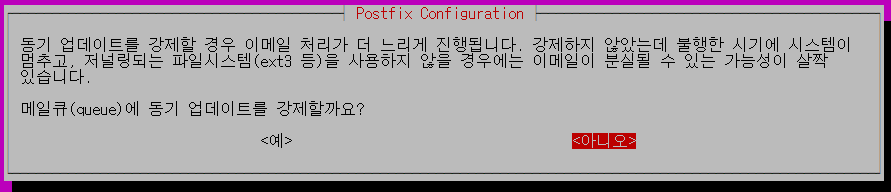
5. No (동기업데이트 Yes: 속도가 느림, No: 메일이 손실될 수 있음)
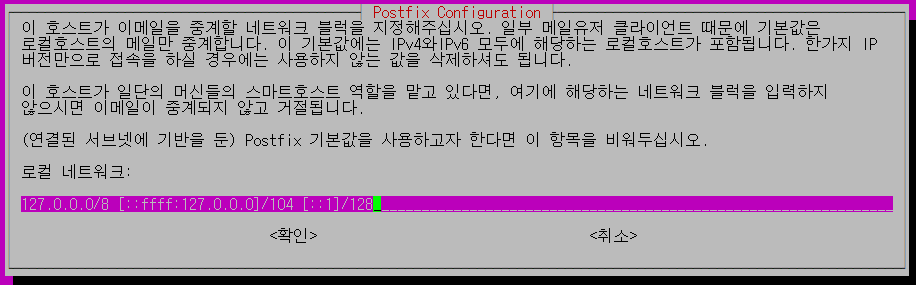
6. 127.0.0.0/8
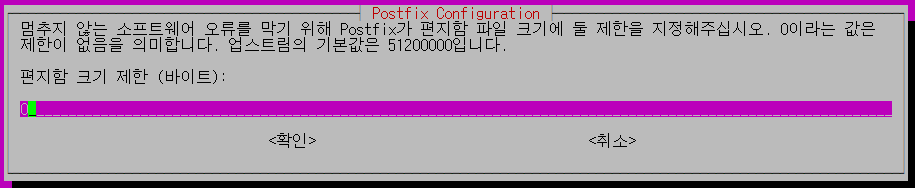
7. 0
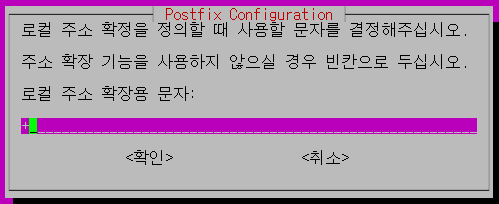
8. +
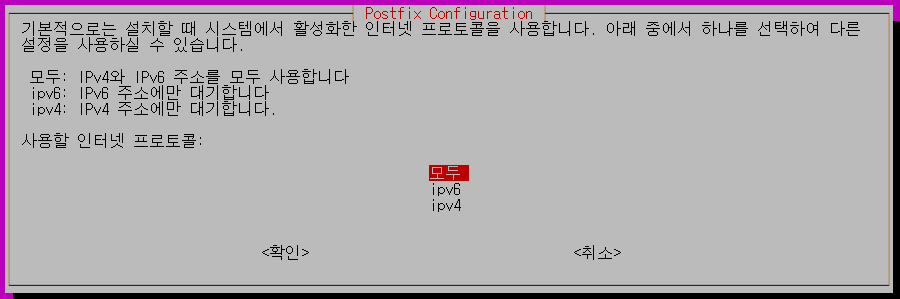
9. all아래의 내용은 Postfix 설정파일인 main.cf에서 설정가능하다.

이렇게 설정을 한 뒤 아래 명령어를 실행하면 postfix 메일 데몬이 실행된다.
# 메일서버 데몬 시작하기
service postfix start

# 메일서버 데몬 포트확인
netstat -ntl | grep 25
추가적으로 Postfix 설정파일인 main.cf 파일을 수정해야한다.
vi /etc/postfix/main.cf 또는 nano /etc/postfix/main.cf 명령어로 설정파일을 열고 맨 아래쪽에 아래에 있는 설정내용을 추가한다.
home_mailbox = Maildir/
smtpd_sasl_type = dovecot
smtpd_sasl_path = private/auth
smtpd_sasl_local_domain =
smtpd_sasl_security_options = noanonymous
broken_sasl_auth_clients = yes
smtpd_sasl_auth_enable = yes
smtpd_recipient_restrictions = permit_mynetworks,permit_sasl_authenticated,reject_unauth_destination
smtp_tls_security_level = may
smtpd_tls_security_level = may
smtp_tls_note_starttls_offer = yes
smtpd_tls_loglevel = 9
smtpd_tls_received_header = yes
SSL통신을 구현하기 위해 SSL인증서를 만들어야 하는데 openssl을 통해 사설로 발급하여 사용하거나, comodo와 같은 공인CA기관을 통해 인증서를 유료로 구매하거나 혹은 무료로 SSL 인증서를 발급받는 방법이다. 여기서는 Openssl을 통해 인증서를 발급할 것이고 추후 무료 SSL인증서 발급받는법에 대해 포스팅 하도록 하겠다.
#openssl로 서버 개인키 생성하기
openssl genrsa -des3 -out server.key 2048

#인증요청서 생성(사이트 설정에 맞게 국가 및 기관정보등을 입력)
openssl req -new -key server.key -out server.csr
#서버인증서 생성 (유효기간설정 -days(일단위) 필요에따라 기간을 설정한다)
openssl x509 -req -days 365 -in server.csr -signkey server.key -out server.crt
#서버 개인키에서 패스워드 제거(선택사항)
openssl rsa -in server.key -out server.key.unenc
mv server.key server.key.enc
mv server.key.unenc server.key
#
openssl req -new -x509 -keyout smtp.key -out smtp.pem -days 3650
저렇게 하면 smtp주소가 뭐이며 보내는 메일주소는 뭘로 해야 하나요?
1 개인도메인이 있다면 dns 셋팅해서 개인 도메으로 설정할 수 있고
2 또는 네이버 같은데에서 smtp 설정을 통해서 대행해서 발송할 수 있습니다.